Pages

Monday, August 16, 2010

Day 4# Simple Blouse Pattern (Part 2)


I supposed to post this project on Saturday, but i have a lot of thing to do: clean the house, baking cake, deliver cake orders. But it doesn't really matter when i should post this, as long as i have time to share it with you, i will do it.

In this tutorial
I'll show you how to make simple blouse pattern with real measurements.

The Bodice Part :


First, you need old newspaper, or any other paper as long as width. Fold the paper.


Pull the line, start from the fold.


Measure from the fold of the paper 7.5 cm (A-C).


Then 13 cm from B point to C (B-C)


Measure downward 4 cm (B-D2)


From A to A1 measure 2 cm


From C1 to C2 measure 2 cm


Pull straight line from C1 to D2 (in the picture i write D1). Pull also the straight line from C2 to B1.


Measure downward from A1 to C 7.5 cm


Pull the line parallel to A- C from C1, and pull the line parallel to A - C1 from C.


Connect point C to C1 with curve arches


Do the same thing from point A1 to C


And.... you will have this figure


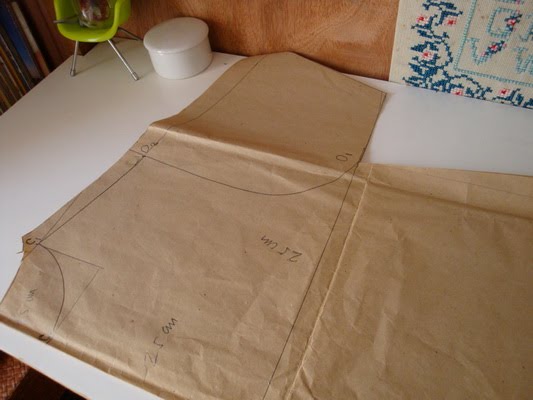
From C, measure downward 25 cm to D


Aside from D point to D1, measure 25 cm


Connect from D1 to D2 with curve arches


This is the figure you will have


Extend the line from B1 and D2 downward. Measure 22 cm (sleeve length). Then pull the line downward, rectangle on the extention line.


And...you will have this figure


Then, cut along the outer lines.


Cut the fold parts


Now, you have two pieces of the bodice pattern : front side and back side


Take the front side, then cut along the outer lines


Here's the back side


The Sleeve Part :


Fold the paper. Measure from the fold part 12 cm (A- B)
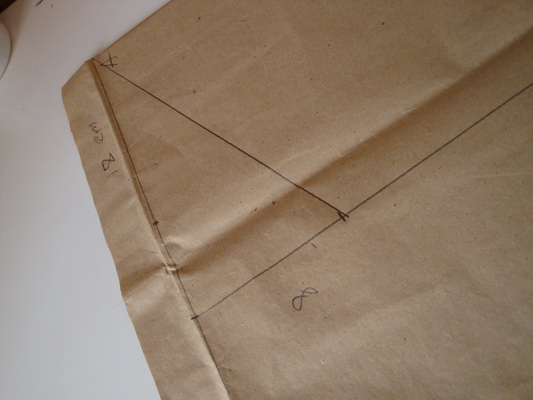

From B, measure downward 8 cm (B1). Then connect from A to B1


Devide this line (A-B1) into four equal parts. From A2 measure downward 1.5 cm, and from A1 measure upward 1.5 cm.


Align CenterThen connect this point, from B1 to A


Cut along the outer lines


And...here is the sleeve parts

Friday, August 13, 2010

Day 3# Simple Blouse Pattern (Part 1)


Today i feel so weak, burn and sleepy. Its not because the weather so hot. But, after first three days our body will live on its own substance. When the body deprived of nutrition, our body will burn and digest its own tissues by self digestion. First, it will decomposed and burn those cells and tissues which are diseased, damaged, aging or dead. That's one of the reason why fasting is good for our healthy.


So, for this Ramadhan tutorial project I'll share with you how to make your own simple blouse pattern. Its easy to make and also easy to sew.


The important thing to make your own pattern is you have to take measurements. And here how to take your own measurements. (source : Burda magazines)


figure 1.

I take size 44 on Burda measurements chart. We will make the bodice (both front and back side) and the sleeve one at the time.

Please look at figure 1 :

A - C1 = 6 to 7.5 cm
C1 - B = Shoulder width = 13
B - B1 = 4 cm
C1 - C2 = 0.5 cm
A - A1 = 0.5 cm
B1 - D2 = 0.5 cm
A - C = 7 to 8 cm
A - D = D - D1 = E - E1 =( bust/chest) /4 = 100/4 = 25 cm
A - E = Blouse length = 65 - 75 cm
E1 - E2 = 5 -10 cm (depend how width your blouse)
B1 - F = D2 - F = Sleeve length = 61 for long sleeve or 20 -22 for short sleeve
F - F1 = 1/2 x upper arm width = 1/2 x 31 = 15.5 cm


You can also make sleeve pattern separately.


A - B = (1/2 upper arm width) - 3
B - B1 = (1/4 upper arm width) -1
A - C = Sleeve length = 61
C- D = 1/2 upper arm width
A - A1 = A2 - B1 = 1/4 AB1


Tomorrow, I'll show you how to make this pattern with real measurements. Have a great day !

Thursday, August 12, 2010

Day 2# Serikaya for Tajil


During Ramadhan able bodied muslim abstain from food and fluid, and also sexual activity between the hours of sunrise and sunset. Then in the evening when sun goes down and maghrib prayer called, after all day fasting all muslim have to break their fasting. In Indonesia breaking the fast announced by beduk. Beduk is a single headed frame drum which has elongated body.

Evening meals when muslims break their fast called "iftaar". In Indonesia we called it "buka puasa" or "tajil". Including
date palm, there are various unique Indonesian iftar like kolak, cendol, cingcau, serikaya, etc, which is good for bring sugar level back to normal.

In the second day of my Ramadhan Tutorial Project, I'll make one of my favorite tajil :
Serikaya. It made from only three ingredients : coconut milk, brown sugar (Gula jawa) and eggs. But you can also add flour or maize to made it more thicker. Its better to use freshly squeezed coconut milk, but if its difficult for you to make, you can use ready make coconut milk.

All you need is :


200 ml ready make coconut milk dilute until 300 ml, 3 eggs, 100 gram brown sugar (gula jawa), 50 gram sugar, 1 tablespoon of maize, and sufficient of salt.


Put gula jawa, salt and eggs into the bowl.


Beat until all gula jawa dissolve.


Add in maize, stir until well mixed.


Then, pour coconut milk into the bowl gradually.


Stir until well mixed.


Strain the mixture into a new and clean bowl/container to make sure no coarse foreign matter in the spread.


Prepare the mold, put the mixture into it.
Steam in the medium heat until done (about 30 minutes)
.

Wednesday, August 11, 2010

Ramadhan Tutorial Project : Day 1# Chocolate Cup Cake


I chalenged by my sister to make ramadhan tutorial project. I thought its good for me to spend time during ramadhan with a usefull activity.
I start my first tutorial project with this simple project. You can make this cup cake for Eid Mubarak day.

All you need is :


4 eggs (you can add 2 egg yolk), 200 g sugar, 150 g flour, 50 g chocolate powder, 200 g margarine or butter, 1 tea spoon emulgator (SP, ovalet, TBM, Quick), 1 tablespoon chocolate paste and meises

What should we do now ?

First, put all the ingridients into the bowl, except margarine/butter


Preheat margarine/butter untill completely melted


Mix using medium speed (5 minutes)


Then mix using high speed until thick and pale ( its about 10 to 15 minutes)


Put one table spoon of chocolate paste into the bowl


Mix, with medium speed untill well mixed


Pour, melted margarine/butter into the bowl. Mix using medium speed, until well mixed.


Prepared pan, put paper cup on it


Pour the dough ; three fourth from the heights of the paper cup


Bake at 180 degree celcius for 15 - 20 minutes or until toothpicks comes out clean.


Happy baking !!!!!


Sunday, July 4, 2010

Decorate the box


I decorated this box a year ago as a present for my friend. And now i want to share with you how to decorate boxes in various shapes and sizes.


You need : scissor, glue, 3 mm sponge, and 1 mm cardboard (2 mm or 3 mm cardboard more better)


You also need an ornament whatever you like. But now, i used my ribbon embroidery. Don't forget to provide a ready made box. The box size and an ornament should be match.


First you have to cut the cardboard same size with the box cover


Do the same thing with the sponge.


You will have one piece of cardboard and one piece of sponge.


Put glue on the cardboard, then the sponge placed thereon. Let it dry.


Put the ornament upside down on the table. Then, the sponge placed above the ornament.


Pull the right side and stick on top the cardboard that have been given by glue.


Here, after you pull the left and right side and stick on the top of the cardboard


Last, you will have this one.


Then put the ornament above the box cover that have been given by glue. Trim by putting the cord around the it.


Sunday, June 27, 2010

My First Amigurumi


What is amigurumi actually? Wikipedia define as the jappanese art of knitting or crocheting small stuffed animals and anthropomorphic creatures. The word is derived from a combination of the Japanese words ami, meaning crocheted or knitted, and nuigurumi, meaning stuffed doll. Amigurumi are typically animals, but can include artistic renderings or inanimate objects endowed with anthropomorphic features.


Dian teach me how to make amigurumi for the first time. She also sharing a simple pattern to construct an amigurumi with me. So i can make my own amigurumi by crocheting. Eventhough i never knitting amigurumi yet, but i think its more easier crocheting amigurumi than knitting (How i can compare between crocheting and knitting amigurumi if i never done one them, hhhmmm i must learn knitting amigurumi later). One of my reason, its more easier to shape any creature by crocheting than knitting.


All above is my first amigurumi. I take a picture a month ago and i didn't put any caracter yet. But now they have eyes, nose, and mouth (sory, but i forgot to take a picture). One of them has sold (below)


Monday, June 21, 2010

Photocakes decoration


Last thursday i came to 'hands on demo photocakes decoration' program. Its nice, i have something new to learn. Cake decorating become more easier. Unlimited creativity in decorating cakes.

You can put your own picture on a cake and on chocolate lolipop.


It will more easier to design, if you can operate 'photoshop' or 'corel draw'. Compatible printer recommended was canon IP series like IP 3600 and IP 4700. You also need compatible food cartridges as well as set edible ink. You are not recommended using edible ink in in a printer that has previously been used with regular ink cartridges, even you try to cleaned it because it was contaminated and the cake can not eat.