Pages

Friday, December 18, 2009

The colorful of felt fiber


My friend watie, asking me to buy felt fiber in any color. First time i met her a years ago, when she learned ribbon embroidery. She and her husband love crafts very much.
This time, she has felt making project.

There are many types of felt fiber. Some are very soft and some are very tough enough to form construction material. It can made into any shape and any size.


Kazakh Yurt

Felt used everywhere, from automotive industry or just to made a puppet. Felt is also used for professioal Billiard table and also to cover a yurt. Yurt is a traditional home in kazakhstan and in mongolia.


Eventhough i don't have a plan for felt making project, but really, i can't take my eyes of this colorful felt fiber. Finally i have twelve color. At home, i list down a lot of things i want to make (of course covering yurt isn't on my list...lol). There are :
  1. Baby booties
  2. Needle Book
  3. Knitting needle case
  4. Cushion cover
  5. Scarf
  6. Pin
Which projects will i make for the first time? Hhhmmm... Let's see in the next post!

Monday, December 7, 2009

Chrocheting Necklace


What a wonderful day, when i got one day off before Eid ul Adha Mubarak. I just stayed at home and cleaned my room. I opened all the boxes i have and i found four packs of beads in one of the box. Then i remembered all my plan with that beads. I want to chrochet a nakclace.


First time i made a necklace use 'wonder knitter', its easy and fun. Its first class knitting knobby. Top head spin separately, so there is no need to turn the tool in your hand, just rotate with thumb as stitches are completed.


I want to try another technique. I thought chrocheting a necklace is more difficult than knitting use 'wonder knitter'. But then, after i started to try cannot be stopped. Its fun too. Wow, i got eights necklace in a day.


As knitting necklace, first you have to put in the beads into wire or yarn, it depend on you. I use cooperline 0.3 mm, its appropriate for jewelry. Its available in any color, like blue, puple, silver, magenta etc.


Then you can start to chrochet it. I use two kind of stitches : chain and single chrochet, its very simple for beginner like me. You can make any variation with this two stitches.


You can also mix the beads when you put in the wire or yarn. Its really fun.


Avoiding the phrase “I don’t have time...”, will soon help you to realize that you do have the time needed for just about anything you choose to accomplish in life (Bo Bennett). Enjoy your life, be fun with your hobby.

Thursday, November 26, 2009

Wall decoration of Tulips and Sunflowers


A game can be an inspiration for us to stitch something. I'm crazy in farmville lately. For a couple days i love to plant flowers, flowers and flowers. There are three kind of flowers in this games : sunflowers, red tulips and pink roses. When i'm harvesting in my farm, i found something interesting : a bouquet of sunflowers, pink roses and red tulips that i can share with my friends. This games teach us to share and help each others.


I stitch this wall decoration as a present for my friend, vera. She and her family will relocation from Kuala Lumpur to Vietnam this month. Thanks vera for every beautiful memories that you bring to me.


Tulips

This flowers stitched with french not in the middle, covered with ribbon stitch, then both sides stitched with side ribbon stitch. I'm using 5 mm satin ribbon for the flowers and 3 mm organza ribbon for the leaves


Sun Flowers

I usually stitch sun flowers using 5 mm satin ribbon. But now i try to use 3 mm satin ribbon for a petal of the flowers and 3 mm organza for the leaves. In the middle of the flower i stitch with french knot for the stamens. .

Enjoy your life and find an inspiration in every single moment of your life

Monday, November 16, 2009

Embroidered the fabric for baju kurung (1)


When i lived in Kuala Lumpur two years ago, i met so many friends who love crafts very much. We shared a few things about crafts. Thanks to Linda for giving me a chance to embroidered her baju kurung for the first time. We're try to make this as a side business, by selling this ribbon embroidered fabric. And here some of my design in ribbon embroidery


Bodice part

End of sleeve part

Embroidered on blue satin silk fabric. I choose spider web rose in the centre. Stitch with two combination ribbon. Inside of the rose i use satin ribbon 3 mm and the outside i use organza ribbon 3 mm. Petal rose stitch with lazy daizy and bulion stitch use 3 mm satin ribbon. Leaves stitch with ribbon stitch use organza ribbon.


Bodice part

End of sleeve part

Embroidered on dark chocolate satin silk fabric. There are three kind of flower on the bodice part. First, i called it tulip, stitch with french not in the centre then covered with ribbon stitch and side ribbon stitch on the both side. The yellow one stitch with lazy daisy, use 3 mm satin ribbon. And the last one stitch with ribbon stitch and french knot.


Bodice part

End of sleeve part

Still embroidered on satin silk. The flowers stitch with ribbon stitch, use 5 mm and 3 mm satin ribbon. Stitch five to six petals each flower.

Saturday, November 14, 2009

Bread Pudding


This pudding is one of my favorite pudding, coz its easy to prepare and cook.
You don't need mixer, neither oven. Just mix the ingridient, then steamed. That's it. And if you don't have weighing balance, you can use measurement cup.
The texture of this puding is soft. More delicious if you kept it in refrigerator before you eat

Ingridient :


1. 200 g sugar ( you can take it more or less depend on your taste)
2. 500 ml fresh milk
3. 3 eggs
4. 100 g raisins (you can take it more).
5. 1 pack bread (10 to 12 slices)
6. vanila extrack sufficiently


Direction :


Preheat steamer, until boiled


Cut out bread slices into small pieces


Combine sugar, eggs, and vanila extract in small bowl


Gradually, pour fresh milk into the bowl.


Put bread pieces into the mixture, then stir it .


Last, put raisins into the bowl, stir it.


Prepared pan size 10 x 20 cm (2 pieces) that have been covered by parchment paper.
Pour the mixture into pan.
Then steamed about 40 minutes.
Remove from steamer.
Cool on pan about 20 minutes, then remove into wire rack to cool completely.
Put it in refrigerator.


Note :
You can also use plastic ware. Take heat resistant one.
I take chocolate chip, coz thats all i have. You can put anything else such as : young coconut, walnut, prunes, jackfruit pieces etc. But raisins, young coconut, and jackfruit pieces more suitable for this puding.


Tuesday, November 10, 2009

"Red Batik" Peasant Blouse (2) : an easy step to cut and sew

This peasant blose made from batik Garut. Garut is one area in west java, Indonesia. Batik is a traditional folk crafts. Batik produced in almost every region in Indonesia, and it has their own style, motif and uniqueness, such as batik Pekalongan, batik Solo, batik Yogyakarta, batik Wonogiri, batik Cirebon, Batik Madura, batik Banyumas, batik Garut, batik Tasikmalaya, etc.

Last post i show you how to construct your own pesant blouse pattern. And in this post, i'll show you a simple tutorial how to cut and sew this blouse.


Material :
  • Fabric, 2 m long if your fabric width was 1.25 m or 1.5 m if your fabric width was 1.5 (Its also depend on your body. You can take cotton, batik or any other fabric material as you like.
  • Sewing thread, the same color with your fabric
  • 0,5 m, elastic (i use 0,5 cm elastic)

Equipement :

  • scissors
  • pin
  • tailor's chalk (not so necessary)

  • Fold your fabric
  • Layout the fabric, place your bodice section on the fold, place in using pin
  • Cut out
  • Its more easier if you cut two layers on the fold, but it must be careful. Some fabric a lil bit slippy. It can cause issues, when you are cut out.

  • Here is the bodice section after you open the fold

  • Fold your fabric
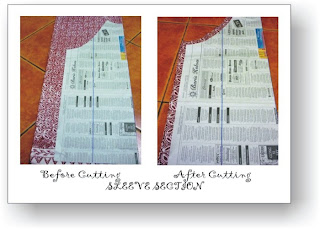
  • Lay out your fabric, then place your sleeve section on the fold, place in using pin
  • Cut out

  • And here is your sleeve section after you open the fold


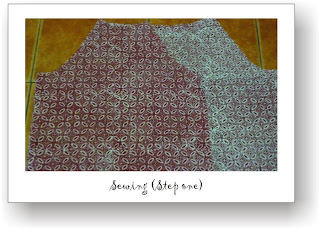
  • Place a sleeve piece on a bodice piece
  • Sew around the armhole


  • Place the other sleeve on the other bodice section. Sew the arm hole

  • Fold over the sleeve
  • Lays second bodice on top
  • Place a sleeve on the arm hole, sew. As well as the others

  • Sew from sleeve end down side to the bottom of the blouse


  • Fold over neckhole, sew down
  • Sew the elastic around the neckhole with strong stretch
  • Last, fold over sleeve end, sew down.


The finished Blouse :

Saturday, November 7, 2009

Two books from Dutch


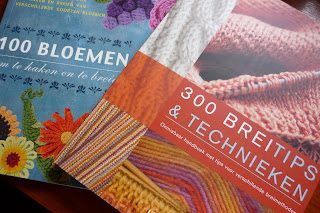
Last week my cousin, Arum, came to my house and giving me this two lovely books. I ask her to buy me craft book when she had visited her aunty in Dutch, two months ago. And i get this two lovely books.


The first book is '100 Bloemen : om te haken en te breien'. A book for the chrochet and knittig lovers. And this book is for beginner.


Inside it you can find anykind of flowers, fruit, leaves and also insects. This book also for nature lovers, for everyone who loves gardening. You can create your own crochet or knittig garden.


The pattern available in a description form and a diagram form. So, eventhough i can speak dutch, i still can read the pattern.


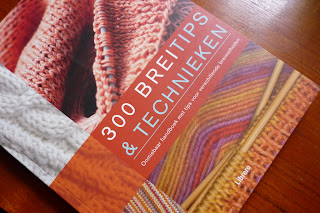
The second book is '300 Breitips & Technieken'. A Handbook with tips for using different method of knitting.


This, an interesting part of this book. How to dye the yarn using natural dyes. But unfortunately i do not understand with the language. And this book is not equipped with the diagram form. All the pattern available just in a description form.

Can't wait to chrochet my own garden. Thanks Arum, love you and this book so much.